Techniques for ultrasound-guided, percutaneous core-needle breast biopsy
Images


Ultrasound-guided, percutaneous core-needle breast biopsy is an indispensable tool for radiologists who need to sample ultrasound-detected lesions that are suspicious or highly suggestive of malignancy (Breast Imaging-Reporting and Data System [BI-RADS®] category 4 and 5 lesions).1 When performed correctly, this procedure is a relatively safe, minimally invasive procedure with diagnostic accuracy comparable to open surgical biopsy.2-6 Furthermore, core-needle biopsy is more accurate than fine-needle aspiration and typically provides core samples of sufficient quality to stain for markers, which can guide neoadjuvant treatment options when malignant processes are discovered.7-9 For benign lesions, core-needle biopsy often allows patients to avoid surgical biopsy, a more invasive, time-consuming, costly, and anxiety-provoking procedure. Surgical biopsy is also technically more difficult, has increased risk of complications and increased recovery time and is more likely to have an unsatisfactory cosmetic result.3-5,10,11 If surgical excision is required after a core biopsy, surgical planning is often altered by the biopsy results, increasing the probability that definitive surgery is performed the first time.
However, before attempting a breast biopsy, the radiologist should be familiar with important aspects of the procedure. Some of these include choosing the most appropriate biopsy device, optimal patient positioning, safe and effective handling of the needle, and providing the patient with post-biopsy care and instructions. This article presents a step-by-step description of how the authors perform ultrasound-guided core-needle breast biopsies safely, effectively, and efficiently at our institution.
Preparation, ultrasound, and positioning
Before the procedure, prior imaging pertinent to the case should be reviewed. Informed consent should be obtained from the patient after discussing the procedure’s risks, benefits, and alternatives. Risks we routinely discuss include bleeding, infection, placement of tissue markers, and the potential need for additional surgery due to discordant results. We also discuss the risk of milk fistula with lactating women. Additionally, we assess for any relevant allergies and whether the patient could be pregnant (pertinent in regard to postprocedure mammograms). Immediately before starting the procedure, we perform a time-out involving all members of the medical team and the patient, in adherence to the Joint Commission’s Universal Protocol for Preventing Wrong Site, Wrong Procedure, and Wrong Person Surgery.12
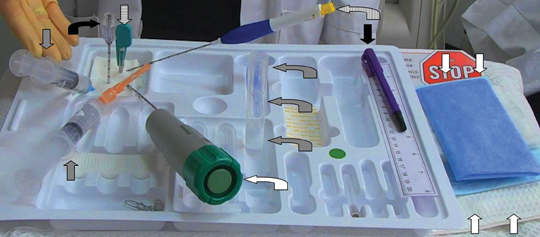
The biopsy tray should be assembled in a consistent way before each procedure. This ensures the operator is able to quickly locate all elements, while minimizing the risk of accidental needle sticks and contamination (Figure 1). The operator should also detach the introducer trocar from its cannula to ensure smooth separation and perform a test deployment of the biopsy device to confirm proper function. This provides an opportunity to demonstrate for the patient the sound produced by deployment, reducing the risk of startling the patient at the critical moment of obtaining the sample.
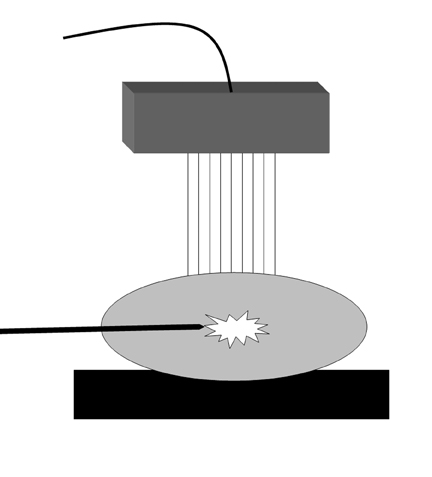
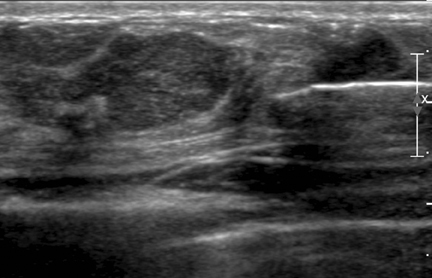
The patient should be optimally positioned to maximize safety and ease of access to the target lesion. This typically involves elevating and flattening the breast. For targets in the outer breast, placing a foam wedge behind the ipsilateral shoulder can be useful to oblique the patient and roll the breast toward midline. The foam wedge is typically not employed for lesions in the medial breast, save for occasionally placing it below the contralateral shoulder to roll the breast away from the sternum and contralateral breast. Having the patient abduct the ipsilateral arm over her head, resting it on rolled towels for comfort, can reduce slack in the breast. However, if there is not enough tissue around the lesion to perform the biopsy safely, the arm may be lowered slightly to increase breast thickness. Additionally, the fifth finger of the hand operating the transducer can be used to grasp the breast tissue distal to the anticipated approach of the biopsy device, pulling the tissue toward the operator. This technique can move the target lesion closer to the device, increase tissue bulk around the target, and stabilize mobile lesions. However, take great care when implementing this technique to ensure the fingers of the operator will not be in the line of fire of the biopsy device. When positioning the patient, keep in mind that the skin will need to be entered far enough from the transducer to easily position the needle parallel to the chest wall and perpendicular to the ultrasound beam. Keeping the needle oriented perpendicular to the beam can substantially improve needle visibility by maximizing the number of reflected echoes (Figure 5).
Before cleaning the site, obtain images clearly documenting the target lesion and the location of any nearby sensitive anatomy, such as the skin or pectoralis muscle. Employ color Doppler to determine the position of any nearby large vessels. Occasionally, it is helpful to mark the skin over the lesion, especially when the lesion is difficult to delineate from surrounding breast parenchyma. Accomplish this by tapping the skin adjacent to the ultrasound probe, and marking the location where movement is observed directly overlying the lesion. Preprocedure ultrasound and positioning are vital to determining the optimal approach and the most appropriate biopsy device to employ. These factors can substantially impact the efficiency and safety of the procedure.
Devices
Many core-needle biopsy devices with variable needle gauges and lengths are available. We typically employ a 14-gauge Monopty® device (Bard, Tempe, AZ) with a 10-cm needle. With the press of a button, this single-use, disposable, spring-loaded automatic deployment device obtains tissue samples by firing a stylet at high speed into the target lesion, rapidly followed by the cutting cannula. The rapid-fire throw of automatic deployment devices may aid in adequate penetration and sampling of dense or mobile lesions. However, it is important to remember that the device’s throw length (eg, 2.2 cm for the Monopty® device) and the course of the throw cannot be predicted with absolute precision. Therefore, before deploying an automated throw device, the operator must ensure that sensitive structures, such as the skin, the pectoralis muscle, and large vessels are not in the potential deployment path of the device.
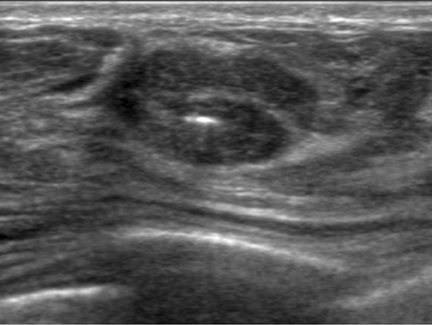
In situations where anatomy prohibits safe automatic deployment, a device allowing for manual placement of the open sample notch should be considered. In these situations, we employ a 14-gauge Achieve® biopsy device (Cardinal Health, Dublin, OH) that can deploy the stylet independent of the cutting cannula. The stylet can be deployed outside the patient, preventing damage to sensitive anatomy adjacent to the lesion. After feeding the stylet through the introducer, the open sample notch can easily be visualized by ultrasound (Figure 2). This allows a high degree of precision for the operator to manually verify and document placement of the sample notch within the lesion or a particular portion of a lesion. The outer cutting cannula is then deployed, rapidly advancing over the specimen in the sample notch without changing the needle tip position.
Directional vacuum-assisted core-needle biopsy devices use a vacuum to pull tissue into the open sample aperture. These devices can rapidly acquire multiple specimens from a single insertion, allowing for shorter procedure time and reduced trauma. We employ the handheld Finesse® Ultra Breast Biopsy System with either a 10-gauge or 14-gauge needle (Bard, Murray Hill, NJ). Vacuum-assisted core biopsy devices are particularly well-suited for small lesions that may be challenging to precisely target with automatic deployment devices. When sampling a small lesion, the needle is manually advanced posterior to the lesion. The cutting cannula is then retracted, and the open sample notch is rotated anteriorly to face the target lesion. This easily visualizes the lesion in the sample notch and permits real-time sample monitoring. Taking multiple samples with this method may entirely remove small lesions, with the exclusion of possible microscopic residual.13 For larger lesions, the needle of the vacuum-assisted device is placed within the lesion and rotated between sample acquisitions. We typically rotate at consecutive 2-hour interval clock positions to obtain 6 samples, though selective sampling from one area of the lesion can also be performed.
Local anesthetic
Ultrasound-guided percutaneous core-needle breast biopsy is a clean procedure, although not a strictly sterile one. To minimize risk of infection, we clean the skin with povidone-iodine, cover the area with sterile drapes, and employ a sterile transducer cover. We then inject local anesthetic superficially with a 25-gauge needle, creating a subcutaneous wheel where the skin will be entered. Lidocaine 1% is commonly utilized; this can be buffered with sodium bicarbonate 8.4% in a 10% vol/vol solution to aid transit of anesthetic into the nerve endings and decrease the “burn” sensation experienced by the patient.14 We then administer deeper local anesthetic under ultrasound guidance. We advance the needle to the margin of the lesion and inject anesthetic while drawing the needle back. This provides a “practice run” to simulate the most appropriate angle of approach to the target while numbing along the future path of the biopsy needle. Injecting local anesthetic can also help to optimally position a lesion. If the lesion is too superficial or too deep, injection can push the lesion away from the skin or chest wall (Figure 3). However, for vague target lesions, take care not to obscure the lesion with adjacent anesthetic.
Introducer and needle advancement
We make a small skin incision at the entry site with a #11 blade scalpel to aid in reapproximation of the defect during healing. The blade should be inserted while oriented anteriorly to minimize the amount of subcutaneous tissue lacerated; this may be important for target lesions located near the skin or chest wall. At this point, a coaxial introducer or the needle of the biopsy device can be inserted through the skin incision. At our institution, we almost invariably use a coaxial introducer, which allows multiple samples to be obtained from a single precautious puncture while resulting in less trauma to surrounding tissue. Additionally, a tough fascial layer may exist between the skin entry site and the target lesion that can be traversed once with the introducer to avoid having to cross this tough tissue multiple times with the biopsy needle. This can be particularly helpful when manually advancing a biopsy needle with the stylet extended from the supportive cannula, as the thin sample notch of the stylet is relatively flexible and may bend when encountering thicker facial tissues.
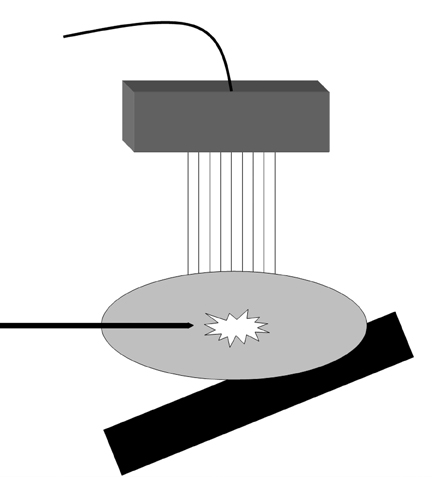
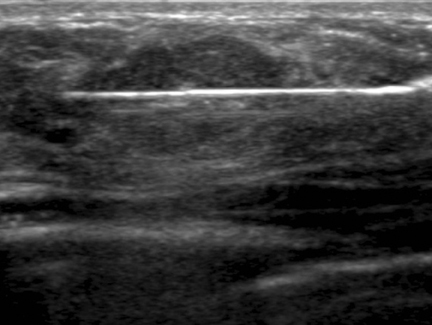
When advancing the introducer, the shaft should be parallel to the chest wall to improve visualization by the ultrasound beam and avoid striking the pectoralis muscle (Figure 4). The transducer and introducer should not be moved simultaneously. To help visualize the introducer needle, use the “sliding technique.” This involves fixing the ultrasound transducer over the lesion while making small sliding or sweeping motions with the needle parallel to the chest wall until it is well-visualized perpendicular to the ultrasound beam. Moving the transducer to locate the needle would result in loss of visualization of the target, which would then have to be relocalized.
Once the introducer is positioned, the inner trocar is removed and the needle is inserted through the cannula. When advancing the needle, the operator should ensure its tip is visualized at all times to avoid inadvertently damaging sensitive anatomic structures. If a large vessel has been identified near the target, then advancing under color Doppler should be considered. A low flow rate Doppler setting (eg, 4 cm/sec) is sensitive for significant blood flow.15
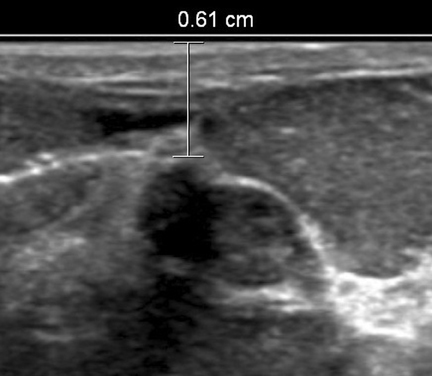
Knowing the biopsy needle’s throw distance and dead space length (eg, 22 mm and 7 mm respectively for the Monopty® device) is important. If the lesion is large enough, the needle tip can be positioned at its margin before being deployed. If the lesion is small, the tip should be positioned far enough away to ensure the sample notch traverses the lesion after deployment. Before firing the device, the length of the needle in the field of view should be in plane with the ultrasound beam to accurately predict where the tip will lie after deployment. Additionally, the needle should be parallel with the underlying chest wall to ensure the pectoralis muscle is not struck when the needle is fired. The predeployment position of the needle should be documented with an image labeled “pre-core” (Figure 5).
Sampling
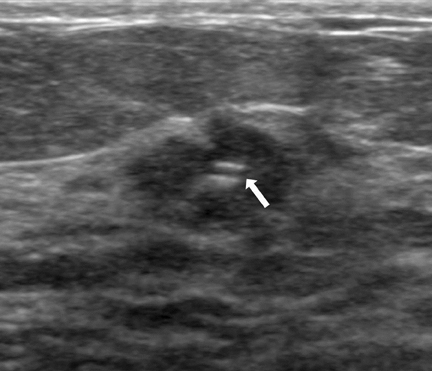
After each deployment, an image documenting the postdeployment position of the needle should be obtained, ideally demonstrating traversal of the target lesion. To ensure the needle was not deflected by the lesion, at least one image in the orthogonal plane should be obtained to document the needle in cross-section within the lesion (Figure 6). Four or 5 high-quality core samples should be sufficient for high diagnostic accuracy.16,17 Taking at least one sample with a portion of specimen bridging the margin of the lesion can aid the pathologist in characterizing the interface between the target lesion and surrounding breast parenchyma (Figure 2). We often attempt to target multiple areas of lesions that are large enough to permit this.
For spring-loaded devices, each specimen must be removed and temporarily placed in a 0.9% sodium chloride solution. We swirl the open sample notch in a collection tube containing enough saline to submerge the notch. First transferring the samples to saline prevents the needle from directly contacting formaldehyde solution in the final specimen jar, thus preventing introduction of formaldehyde into the breast. All samples can be deposited together in the same solution. It is important for the operator to evaluate each specimen in the sample notch and after placing it in the collection tube to ensure adequate cores are obtained. Fatty normal breast tissue tends to be yellow and will generally float in saline. Pathologic tissue tends to be white and will generally sink.16 Of course, a single core will often contain both normal and pathologic tissue. When the biopsy needle is not present in the breast, the operator or assisting technologist can apply manual pressure to minimize bleeding at the biopsy site. After all samples are obtained, the specimen tube should be immediately capped to prevent loss of the samples if the tube is accidentally overturned.
Tissue marker
Any time a specimen is obtained and sent for pathologic or cytologic analysis, a tissue marker, or clip, should be placed at the biopsy site. The tissue marker documents sampling location for easy identification and localization in case the results indicate surgical excision is required. This is particularly important for diminutive lesions that may be annihilated at biopsy or obscured by postbiopsy changes. Tissue markers can save a lot of future aggravation and provide important clinical insurance for the patient.
The angle of approach for the tissue marker deployment device does not have to be parallel to the chest wall, since a throw does not occur. However, the tip of the tissue marker device is very sharp, and the shaft is longer than most biopsy device needles. Thus, the operator must take care in positioning and advancing the device to avoid entering the chest wall or other sensitive anatomic structures. Before deploying a tissue marker, a predeployment image should document the tip of the device at the site. After the tissue marker is deployed, and the introducer and tissue marker device have been removed from the breast, 2 orthogonal images should be obtained documenting the marker position relative to the lesion (Figure 7).
Postbiopsy care
We remove the collection tube containing the specimens from the sterile field and pour the specimens into a specimen jar containing 10% formaldehyde solution. Of note, the few milliliters of saline are not of sufficient volume to significantly dilute the formaldehyde solution. We take care to ensure no samples remain in the saline collection tube after transfer. The operator should ensure that the specimen jar is well labeled, with the lid tightly secured and accompanied by an accurate pathology requisition before sending it to the pathology laboratory. Once the samples are secured and remote from the biopsy tray, the sharps can be disposed of without concern of inadvertently discarding the samples.
To minimize risks of hematoma formation, the assisting technologist should apply pressure to the biopsy site for 10 min or longer until hemostasis is achieved. The incision is then reapproximated with sterile bandage strips. The patient is instructed to avoid strenuous activity, equivalent to lifting a gallon of milk, with the ipsilateral arm for the subsequent 2 days. Postprocedure pain is typically minimal and does not require medication. If not contraindicated, we instruct our patients to take over-the-counter acetaminophen for pain relief.
A postprocedure mammogram with mediolateral and craniocaudal views of the biopsied breast should be performed to document deployment and location of the tissue marker and to determine whether the lesion sampled correlates with mammography findings. Once the pathology results become available, we dictate an addendum to the procedure report indicating whether the results are concordant with imaging findings, and whether follow-up imaging or surgical excision is indicated. Additionally, these conclusions are directly communicated to the referring clinician.
Conclusion
Ultrasound-guided percutaneous core-needle breast biopsy is an effective, minimally-invasive means of sampling breast lesions identified by ultrasound. This procedure is more accurate than fine-needle aspiration and often allows patients to avoid more invasive surgical biopsy. However, it is imperative that radiologists be familiar with the important steps of this procedure before undertaking it. With the optimal choice of biopsy device and a clear understanding of the appropriate techniques presented in this article, ultrasound-guided core-needle biopsy is an extremely safe, efficient, and highly accurate method for diagnosing breast neoplasms.
References
- BI-RADS Committee. Breast Imaging Reporting and Data System Atlas. 4th ed. Reston,VA.: American College of Radiology; 2003.
- Crystal P, Koretz M, Shcharynsky S, et al. Accuracy of sonographically guided 14-gauge core-needle biopsy: Results of 715 consecutive breast biopsies with at least two-year follow-up of benign lesions. J Clin Ultrasound. 2005;33:47-52.
- Youk JH, Kim EK, Kim MJ, Oh KK. Sonographically guided 14-gauge core needle biopsy of breast masses: A review of 2,420 cases with long-term follow-up. AJR Am J Roentgenol. 2008;190:202-207.
- Schueller G, Jaromi S, Ponhold L, et al. US-guided 14-gauge core-needle breast biopsy: Results of a validation study in 1,352 cases. Radiology. 2008;248:406-413.
- ACR Practice Guidelines for the Performance of Ultrasound Guided Percutaneous Breast Interventional Procedures. American College of Radiology; 2009. Available at http://www.acr.org/Quality-Safety/Standards-Guidelines. [2012, July 23].
- Bruening W, Fontanarosa J, Tipton K, et al. Systematic review: Comparative effectiveness of core-needle and open surgical biopsy to diagnose breast lesions. Ann Intern Med. 2010;152:238-246.
- Rotten D, Levaillant JM, Leridon H, et al. Ultrasonographically guided fine needle aspiration cytology and core-needle biopsy in the diagnosis of breast tumors. Eur J Obstet Gynecol Reprod Biol. 1993;49:175-186.
- Willems SM, van Deurzen CH, van Diest PJ. Diagnosis of breast lesions: Fine-needle aspiration cytology or core needle biopsy? A review. J Clin Pathol. 2012;65:287-292.
- Brancato B, Crocetti E, Bianchi S, et al. Accuracy of needle biopsy of breast lesions visible on ultrasound: Audit of fine needle versus core needle biopsy in 3233 consecutive samplings with ascertained outcomes. Breast. 2012;21:449-454.
- Liberman L, Feng TL, Dershaw DD, et al. US-guided core breast biopsy: Use and cost-effectiveness. Radiology. 1998;208:717-723.
- Liberman L. Clinical management issues in percutaneous core breast biopsy. Radiol Clin North Am. 2000; 38:791-807.
- 2012 Accreditation Process Guide for Hospitals. Oakbrook Terrace, IL: The Joint Commission; 2012
- Parker SH, Klaus AJ. Performing a breast biopsy with a directional, vacuum-assisted biopsy instrument. Radiographics. 1997;17:1233-1252.
- Matsumoto MI, Reifsnyder AC, Hartwell GD, et al. Reducing the discomfort of lidocaine administration through pH buffering. J Vasc Interv Radiol. 1994;5:171-175.
- Abe H, Schmidt RA, Sennett CA, et al. US-guided core needle biopsy of axillary lymph nodes in patients with breast cancer: Why and how to do it. Radiographics. 2007;27:S91-99.
- Fishman JE, Milikowski C, Ramsinghani R, et al. US-guided core-needle biopsy of the breast: How many specimens are necessary? Radiology. 2003;226:779–782.
- Kirshenbaum K, Keppke A, Hou K, et al. Reassessing specimen number and diagnostic yield of ultrasound guided breast core biopsy. Breast J. 2012;18:464-469.
Related Articles
Citation
Techniques for ultrasound-guided, percutaneous core-needle breast biopsy. Appl Radiol.
March 4, 2013