MR-guided breast interventions: Pearls and pitfalls, Part 1
Images

Dr. Ojeda is an Assistant Professor of Clinical Radiology at the Moores Cancer Center, University of California, San Diego, La Jolla, CA; and Dr. Mahoney is a Professor of Radiology at the University of Cincinnati Medical Center, Cincinnati, OH.
Disclosure: Dr. Ojeda is an educational consultant for SenoRx, and Dr. Mahoney is an educational consultant for SenoRx and on the Speakers Bureau for Ethicon Endosurgery.
This work is based on educational exhibits presented at RSNA 2008 and ARRS 2009: Ojeda-Fournier H, Middleton MS, Comstock CE. MR-guided breast interventions: Pearls and pitfalls. Radiological Society of North America 2008 Annual Meeting, Chicago, IL. Ojeda-Fournier H, Comstock CE, Middleton MS. MR-guided breast interventions: Pearls and pitfalls. Educational Exhibit. American Roentgen Ray Society. Boston, MA, April 2009.
Dynamic contrast-enhanced breast magnetic resonance imaging (DCE-MRI) has emerged as an important adjunctive modality, and the most sensitive modality available, to evaluate the breast for cancer screening, detection, diagnosis, staging, and treatment follow-up.1 DCE-MRI will find lesions that are mammographically and sonographically occult and lesions that are not clinically evident at physical examination. Despite its high sensitivity, DCE-MRI lacks the specificity to differentiate between benign and malignant lesions. For those lesions that are occult to conventional imaging modalities or physical exam and need to be further investigated, MR-guided breast interventions are essential.
With the mainstreaming of DCE-MRI, MR-guided breast interventions ought also to become broadly available. Current ACR Practice Guidelines for the Performance of MRI of the Breast (2008) state: “Facilities performing breast MRI should have the capacity to perform mammographic correlation, directed breast ultrasound, and MRI-guided interventions, or create a referral arrangement with a cooperating facility that could provide these services.”2 Furthermore, the ACS Guidelines for Screening with Breast MRI as an Adjunct to Mammography state that breast MRI is “to be performed by experienced providers in facilities that provide MRI-guided biopsy for the follow up of any suspicious result.”3 The procedure for performing MR-directed, vacuum-assisted core biopsy is described in detail.
Although several guidance techniques are available, we utilize the grid-localizing technique because of its simplicity and ease of use. Other localizing techniques are reported in the literature, including pillar and post, and free-hand techniques.4,5
Technique/protocol
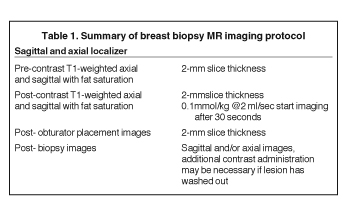
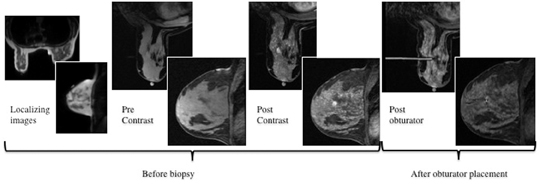
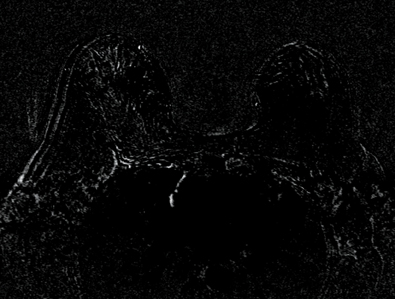
After localizing images, focused axial and sagittal T1-weighted, fat-saturated images are obtained before and after administration of intravenous contrast directed to the area of interest. Gadobenate dimeglumine contrast is administered based on weight (0.1 mmol/kg) with a power injector at a rate of 2ml/sec. Additional images are obtained after placement of the obturator and before biopsy to confirm proper depth and location. The sequences of imaging obtained throughout the procedure are demonstrated in Figure 1. Pre-contrast images are routinely obtained since they are needed to perform image subtraction. This step may be necessary for lesions that are difficult to visualize secondary to marked background glandularity and enhancement. The formula for subtraction is: (Subtraction = Postcontrast—Precontrast).If the images are improperly subtracted, there will be signal void and no lesion will be visualized, as demonstrated in Figure 2. The protocol for MR-guided biopsy is limited to imaging only the area of concern in a unilateral fashion unless bilateral biopsies are to be performed, in which case we again image only the portions of interest in each breast. In fact, the only time when unilateral breast MRI should be performed is during a biopsy. It is important to be aware that the protocol is intended as a limited study for the purpose of biopsy, and is not intended for diagnostic evaluation or follow up. To preserve spatial resolution, 2-mm thin slices are obtained. The biopsy imaging protocol from the University of California, San Diego, CA, is outlined in Table 1.
Equipment
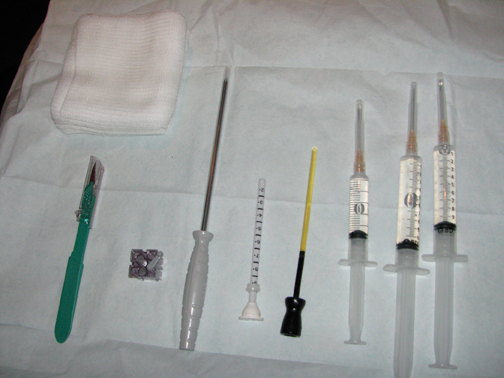
A standard sterile biopsy tray is utilized and is similar to the setup used for ultrasound or stereotactic core biopsy. Scalpels, gauze, and syringes (with lidocaine and lidocaine with epinephrine) for the administration of local anesthetic are part of the basic tray. MR-compatible biopsy equipment, including a biopsy driver, trocar, guide block, and needle guide, is required (Figure 3). There are a number of different MR-biopsy equipment manufacturers (SenoRx, Ethicon, Suros, and Bard). All utilize a similar set of components, including a trocar or stylet, needle guide, and obturator, which are compatible with both the grid and pillar/post methods of localization. Vacuum-assisted devices are preferred over smaller-gauge, single-throw devices that are secondary to speed in obtaining multiple specimens and larger cores that will make for more reliable diagnoses. Fine needle aspiration under MR guidance is not recommended. A dedicated breast coil is required for biopsy and is modified by the addition of a grid to guide localization. Finally, a marker clip is always placed after the biopsy, followed by a mammogram, to document clip location.
Patient selection and preparation
The patient is screened for contraindications for MR imaging, including implantable devices, contrast allergy, or renal insufficiency. Lesions identified by MRI are correlated with the mammogram, and a second-look targeted ultrasound is performed.In a study by LaTrenta, et al., 23% of suspicious MR lesions were subsequently identified by ultrasound,6 allowing biopsy to be performed with ultrasound localization. Both masses and non-mass-like enhancement were sonographically identified.
The advantages of performing an ultrasound-guided biopsy include wide availability, lower cost, greater speed, and more comfort for the patient. As with other interventional procedures, the patient is screened for bleeding risk. In addition, we screen patients for claustrophobia and, if necessary, anxiolytics are recommended and administered. Good communication is imperative; it decreases anxiety before and during the procedure. A detailed explanation ahead of and good communication during the procedure decreases anxiety in many patients. While some prefer to be covered and warm during the procedure, others prefer to be cool and fanned. Taking time to ensure patient comfort before beginning the procedure goes a long way. Padding of pressure points, including the elbows and knees, will increase patient comfort and decrease the possibility of motion during the procedure.
Patient positioning
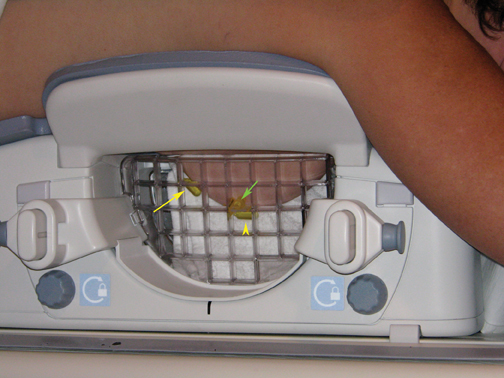
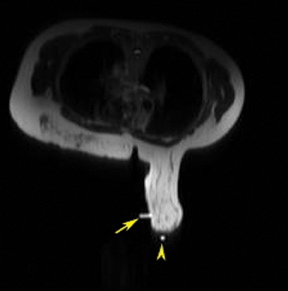
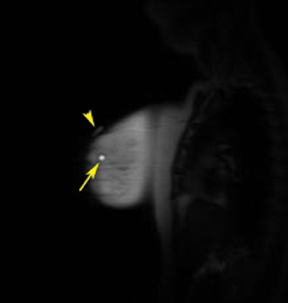
MR-guided biopsy is performed with the patient positioned prone in the breast coil, with the breast compressed within the medial and lateral plates. In some coils, lesion access is limited to the lateral approach. Newer breast coils provide both lateral and medial, and even superior, access. Placing fiducials to mark the nipple and the superior or inferior position of the breast and the grid facilitate orientation (Figure4A). This requires planning ahead to know precisely where to find the lesion. The fiducials are then positioned to assist in triangulation of the lesion. Care should be taken to identify the fiducials on the scout views prior to imaging the breast to be certain that they are included in the field-of-view (Figure 4B). When bilateral biopsies are performed, marking the right and left grids differently is helpful. For example,placing 1 fiducial in the right grid while placing 2 to mark the left allows for fast recognition of laterality, just as marking the superior and inferior positions allows for quick identification of the upper and lower breast.
The breast is compressed between the plate and the grid with sufficient pressure to stabilize the breast tissue and to cause an indentation of the grid on the skin. The grid itself is not visualized by MR. It is the impression caused by the grid on the skin that allows for identification of the grid. Care must be taken not to over-compress the breast, as this can affect contrast enhancement. In a report by Hefler, et al., 3 malignant lesions were not initially identified at biopsy, presumably because of over-compression. The lesions were identified at follow-up and subsequently biopsied.7
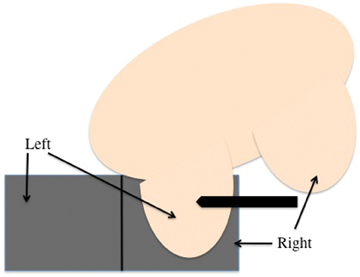
With lateral access breast coils, a medial biopsy is possible in patients with thin body habitus. In those patients, an oblique position with the medial breast against the contralateral lateral grid allows for sampling from the medial aspect of the breast (Figures 5A and B).
Localizing the lesion
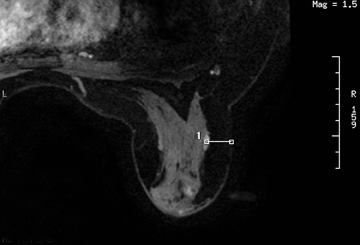
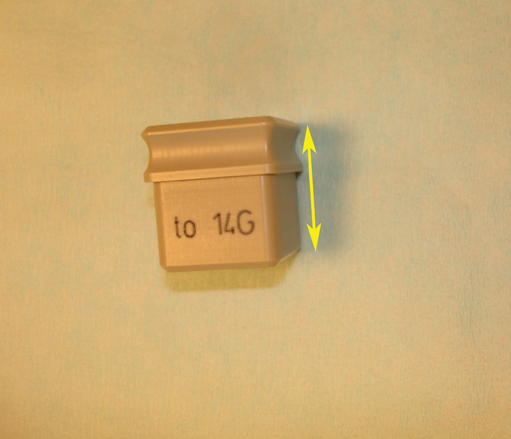
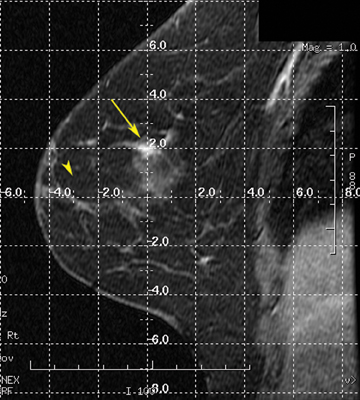
A 2-step approach utilizing axial and sagittal imaging is a simple technique for localizing the lesion. The axial image provides the depth of needle insertion. The depth from skin to the lesion (Figure 6) is added to the 2-cm depth of the guide block (Figure 7) for the total sum of needle-depth insertion. Alternatively, the distance between the lesion location and the skin surface can be obtained by subtracting the slice location coordinates in the sagittal plane. The second step utilizes the sagittal images to identify where in the grid to place the needle(Figure 8). The fiducial placed on the grid guides identification of the opening in the grid. From that marked opening, rows and columns are counted to the lesion location. Care is taken while reviewing images in the workstation and then going to the patient’s side. Planning worksheets provided by breast coil or biopsy needle manufacturers are very helpful and help in transferring information from the monitor to the patient’s side (Figure 9).
A number of commercially available computer -aided detection (CAD) software programs can be used to localize the lesion. This requires identifying the lesion and placing a fiducial marker on the grid.The computer software then provides needle insertion location and depth, oriented in the patient view. Although these programs are accurate and easy to use, clinicians should use caution when employing them, since computer malfunctions and image transfer speeds can delay the procedure. The operator should be able to manually localize the lesion and not depend solely on the computer system.
Warnings and precautions
For safety reasons, only MR-compatible equipment, including the biopsy driver, needles, and trocar, can be brought into the MR suite.
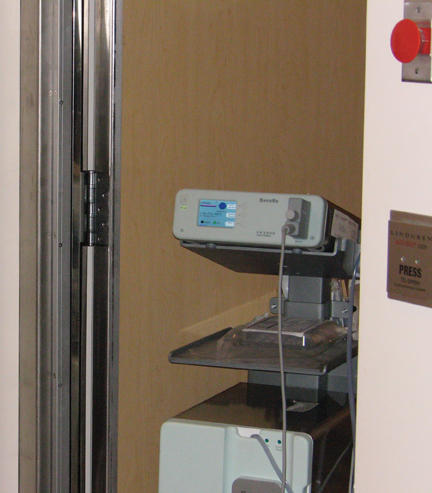
Note that only the foot-pedal and biopsy driver are brought into the MRI suite. The vacuum console is not MR-compatible and is left outside the room, no closer than the door frame (Figure 10). It is prudent to remove sharps from the MR suite, including the trocar, once they have been used as a precautionary measure.
Procedure
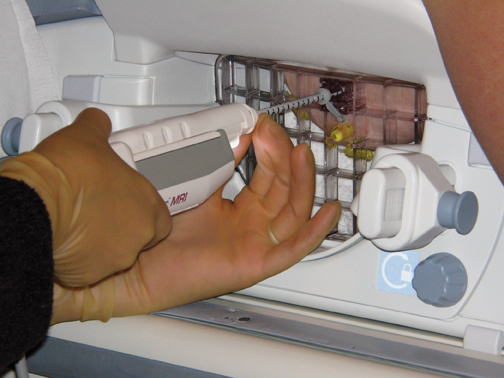
The procedure begins by obtaining informed consent and performing a “time out” to correctly identify the patient and procedure to be performed. Once the lesion is identified and its depth and grid position determined, preparation begins for tissue sampling. The skin is prepped with an appropriate cleaning solution. Lidocaine is infiltrated into the subcutaneous and deep tissues. Additional lidocaine with epinephrine is administered in the deep tissue to promote hemostasis. A small skin incision is made to allow for smooth entrance of the trocar and guide sheath. The trocar is inserted into the sheath, and this unit is inserted into the appropriate opening in the guide block. The block is then placed on the grid with firm pressure; the trocar is advanced to the appropriate depth. The trocar is then removed and replaced by the obturator, a plastic, MR-compatible tube. Additional images can be obtained to confirm proper depth and location before samples are obtained. The obturator is removed and the biopsy device is introduced (Figure 11). Usually, 6 to 12 samples are obtained. Postbiopsy images can then be obtained to confirm proper sampling or removal of the lesion. For this, the obturator is reinserted and additional images are obtained. A marker clip is always deployed either through the biopsy device or via an adaptor in the guide sheath. The breast is then released from the grid and direct digital pressure applied to achieve hemostasis. The skin is cleaned, sterile surgical strips are applied, and the patient is brought to the mammography suite to document marker clip placement. Both written and verbal instructions are given to the patient, along with ice packs to be applied to the biopsy site to help reduce swelling. The patient is also provided with an approximate time-frame in which to expect results as well as any follow-up instructions.
Needle localization
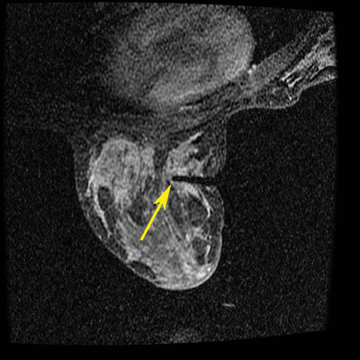
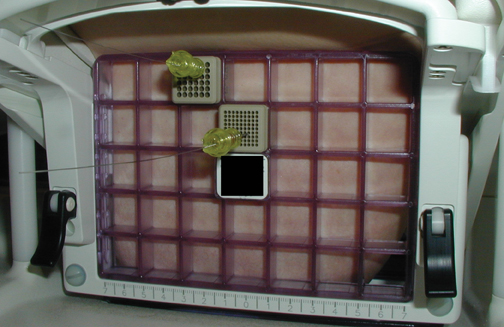
Occasionally, we perform needle localization in patients whose extent of disease is not rendered evident by conventional imaging modalities, and rarely do patients refuse core biopsy. The positioning and localization procedure for needle localization is the same as that for biopsy. Once the lesion is localized, an MR-compatible guide needle is introduced to the appropriate depth. After imaging confirms appropriate location and depth, a guide wire is deployed (Figure 12). A single-view mammogram, along with key images of the MR-localization procedure, is provided as a visual aid to the surgeon in planning for excision.
Conclusion
The technique for preparing and performing an MR-guided core biopsy utilizing a grid has been reviewed. Although other techniques are available, including pillar/post, utilizing a grid for MR guidance is simple, quick, and versatile, allowing for MR-guided localization. In the second part of this article, we will present the potential pitfalls and pearls from our experience performing MR-guided core biopsy. We will also review the details of performing imaging pathology correlation and recommended follow up.
REFERENCES
- Kuhl CK. Current status of breast MR imaging. Part 2. Clinical applications. Radiology. 2007;244:672-691.
- ACR practice guidelines for the performance of MRI of the breast. Practical guidelines and technical standards. 2004;419-424. Available at: http:// www.acr.org. Accessed on February 4, 2011.
- Saslow D, Boetes C, Burke W, et al. American cancer society guidelines for breast screening with MRI as an adjunct to mammography. CA Cancer J Clin. 2007;57:75-89.
- Daniel BL, Birdwell RL, Butts K, et al. Freehand iMRI-guided large-gauge core needle biopsy: A new minimally invasive technique for diagnosis of enhancing breast lesions. J of Magn Reson Imaging. 2001;13:896-902.
- Lehman CD, Eby PR, Chen X, et al. MR imaging-guided breast biopsy using a coaxial technique with a 14-gauge stainless steel core biopsy needle and a titanium sheath. AJR Am J Roentgenol. 2003;181:183-185.
- LaTrenta LR, Mennell JH, Morris EA, et al. Breast lesions detected with MR imaging: Utility and histopathologic importance of identification with US. Radiology. 2003;227:856-861.
- Hefler L, Casselman J, Amaya B, et al. Follow-up of breast lesions detected by MRI not biopsied due to absent enhancement of contrast medium. Eur Radiol. 2003;13:344-346.